*I AM NOT A MECHANIC ANY ADVICE FROM THIS IS YOUR OWN RISK IM JUST A BLOKE WITH TOOLS AND A LOVE FOR CARS*
D22 YD25 2009 NIRVARA 2WD TIMING CHAIN UPGRADE TO DUPLEX.
1) Ensure your car is jacked up and front wheels are off the ground and rear wheels choked
2) Remove batterys
3) Drain engine oil
4) You can drain coolant from bung or do it by removing hoses to raditor top and bottom, over flow hose, remove radiator and brackets, remove fan 4x10mm.
5) Remove all drive belts starting with power steering 12mm pulley tensioner remove bracket completely , losen alternator and slide towards drives side to loosen the tension off belt
remove fan pulley,underneath the engine bay will be another 12mm pulley bolt for AC belt loosen and remove.
6) Remove 2 large coolant hoses from EGR pipe, remove EGR pipe 4x14mm nut, bracket, and 2x12mm inlet pipe.
7) Undo top cover 10mm bolts and pry off top cover ( be careful not the snap or break the cover). there is a dowel pin behind this cover be careful it doesnt fall out and get lost if it falls into the sump its ok as youll need to remove sump later on.
8) Remove power steering brackets and let pump hang out the way
9) Now to remove harmonic balancer bolt to do that put gearbox into 5th gear use a 19mm socket and a breaker bar undo anti clockwise this bolt will be pretty tight you may need a steel tube
to go over your breaker bar for more leverge mine came out pretty easily with a 600mm 1/2" breaker bar.
10) To remove the harmoinic balancer id recommend using this style of puller ToolPRO Bolt Puller Kit 47 Piece youll also need two M6x1.25mmx90mm bolts. on the harmonic balancer inside will be two small threaded holes use the M6x1.25mmx90mm bolts,washer and the tool to remove the balancer. If you use a claw style
puller you may damage the balancer. PUT GEARBOX BACK INTO NETURAL.
11) Remove AC compressor bracket 4x14mm bolts, and underneath will be 2 bolts thatl need to be remove. let compressor hang.
12) Remove all 10mm bolts from lower cover. DO NOT PRY IT YET.
13) REMOVE CRANK ANGLE SENSOR!clean up and put somewhere safe.
14) Remove starter bolts and bellhouse bolts, there are two bolts high up in bellhouse that will be a pain the remove i accessed them by removing the gearstick from inside the cab and running a extension+uni ontop of the bellhouse a mate with a torch will help guide you onto that bolt but i got it off on my own with a bit of perseverance. the top bellhouse bolt closest to the drivers side i got from underneath the bellhouse with 2xUni and a extension. all bellhouse bolts are 14mm. there is one bellhouse bolt above the starter that enters from the opposite side of the bellhouse. i removed the slave cylinder and gearstick but i dont think you have to, i just done it to be safe.
15) Remove cross memeber bolts, i used 2xratchet straps to support the gearbox.
16) Slide the gearbox back enough to get a 1/4" 10mm socket between the bellhouse and engine, there are 2x10mm bolts inside bellhouse thatl need to be removed. BELLHOUSE DOES NOT NEED TO BE REMOVE FULLY JUST ENOUGH TO GET SOCKET IT. GET A TORCH AND LOOK UP YOULL SEE THE 2 BOLTS. REFER TO PHOTO.
17) Remove steering idler bolts 3xbolts going through the chassis on passengers side. you should now be able to move the arm freely so you can push it out the way when you remove the sump. Remove the cross member underneath the sump x4 bolts.
18) Remove dipstick and oil feed hose then black sump bolts all 10mm, and remove. there will be alot of silcone holding it on i used a very very small flat head screw driver and drove it into one side of the sump to break the seal then worked my way around with a blade and removed the sump. Once youve removed this youll see the low oil sensor and pickup with mesh around it , remove the sensor 1x10mm bolt and clean up, remove the pickup 2xbolts and clean up and put somewhere safe with the crank angle sensor.
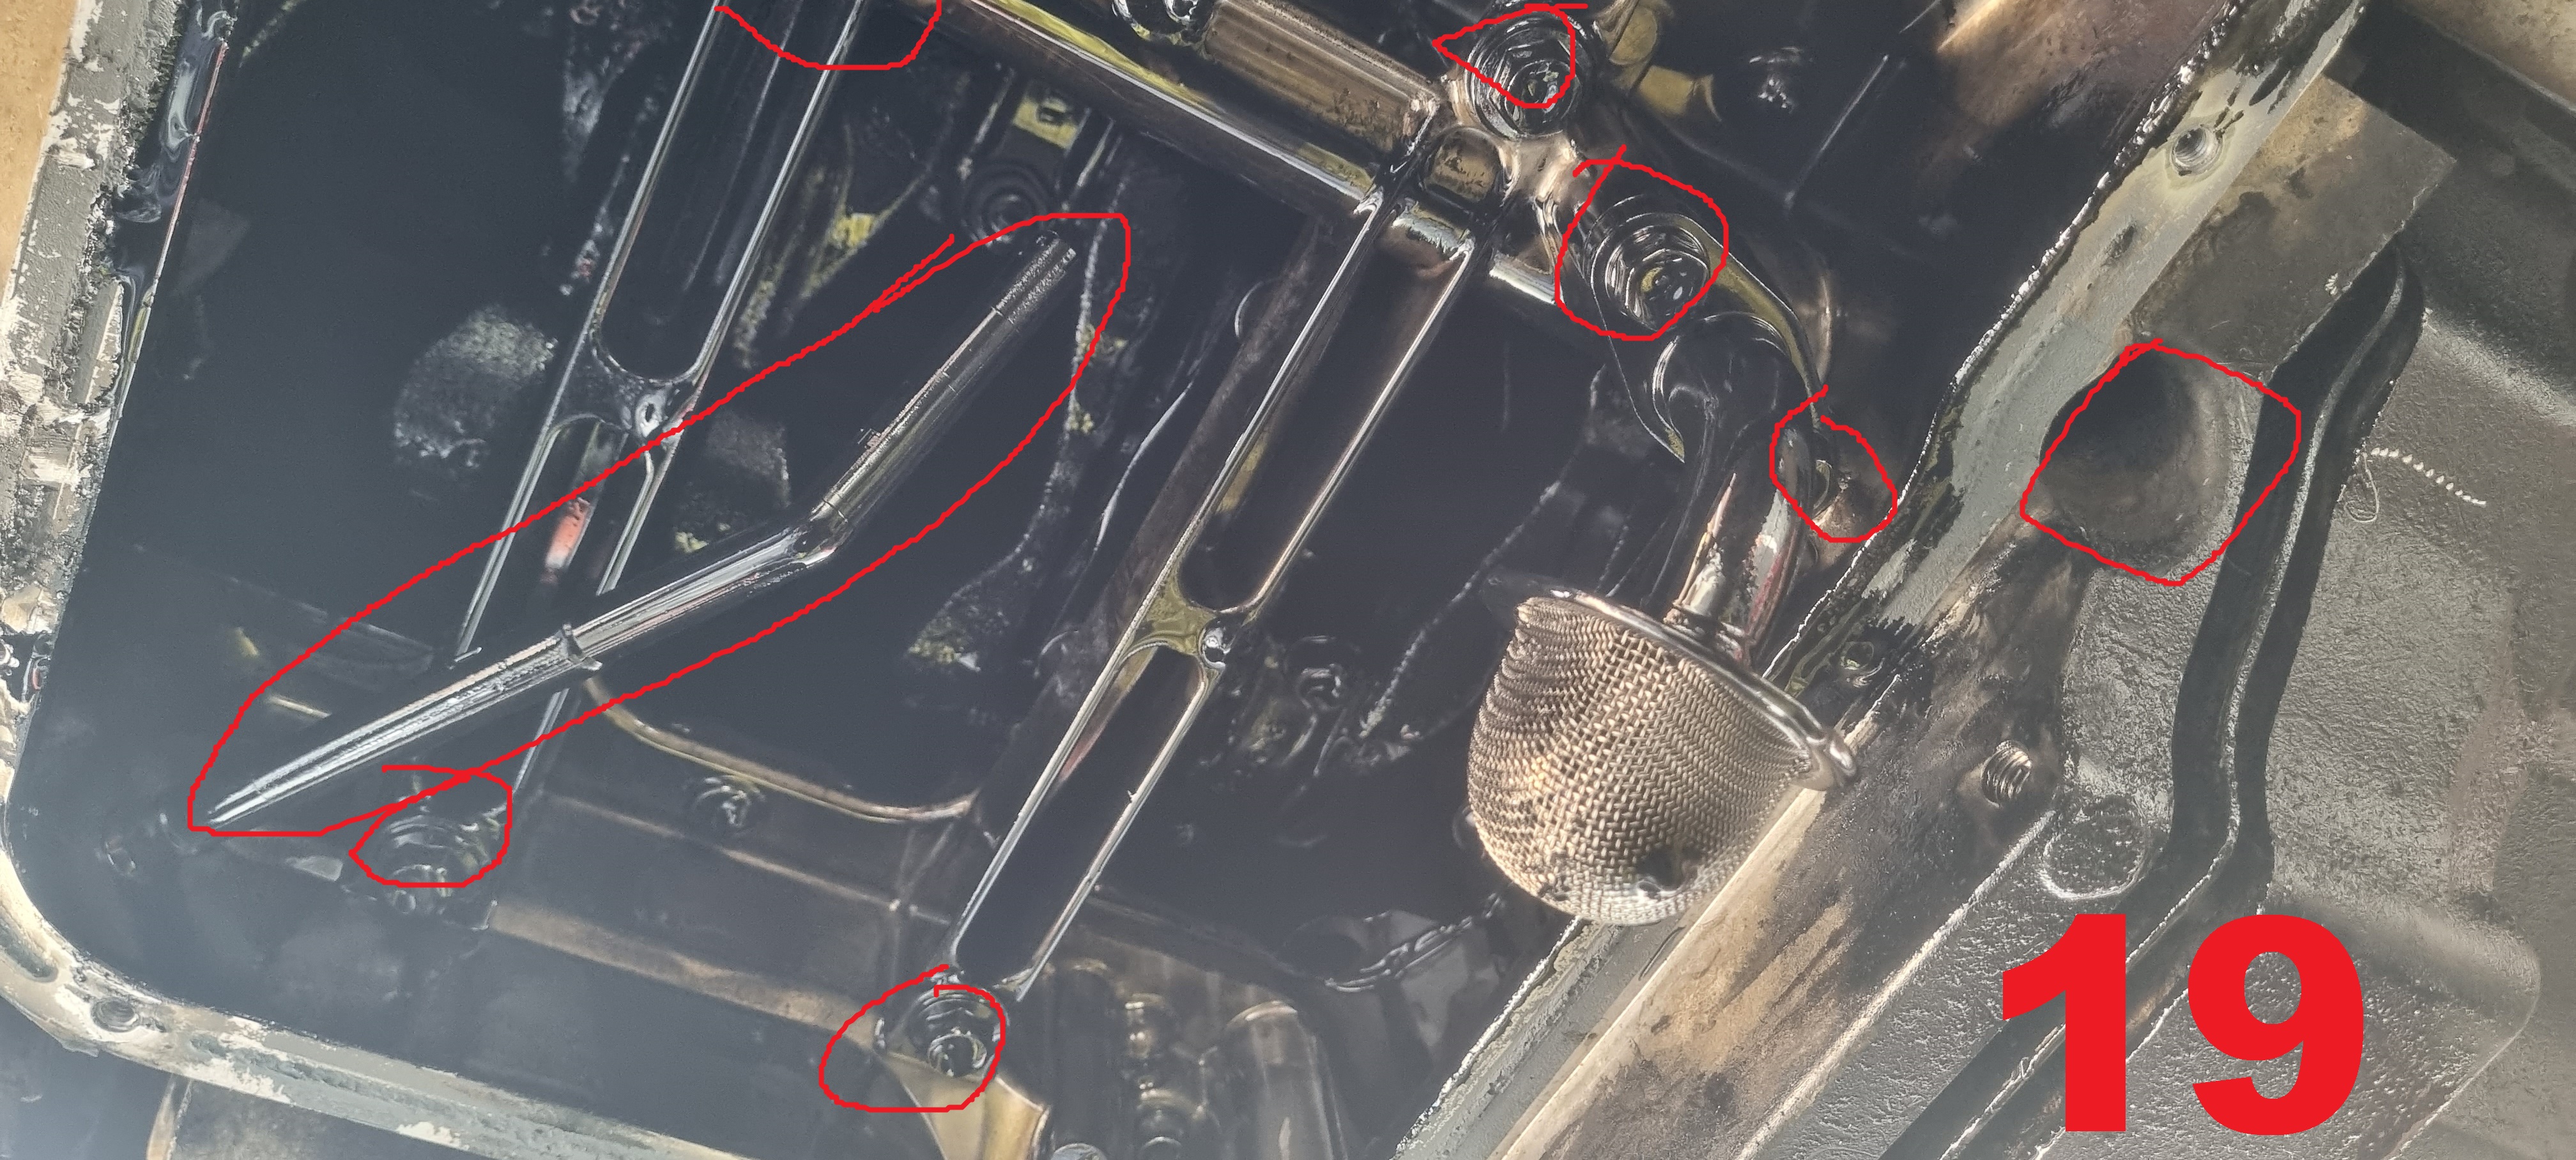
19) Removal of ally sump 4x12mm bolts in ally sump and 12mm near rear of it. remove all front of sump bolts that sit below the lower chain case i numbered all these holes and numbered the bolts so i wouldnt put the wrong ones in the wrong hole as some are longer than others. Pry off the ally sump and clean up. BEWARE OF THE SEAL THAT SITS ON THE OIL PUMP DO NOT LOSE THIS.
20) Lower cover can now be removed be gentle. once removed inspect your oil pump make sure not much wear is present if it is you can order a upgraded one from yd25 website. remove the oil
pump from crank it should just slide off. put somewhere safe. Check the screws on the housing are tight. BEWARE OF ORANGE OIL SEAL DO NOT LOSE.
21) Ensure your gearbox is in netural and put your 19mm balancer bolt into your crank tighten clockwise DO NOT TURN ANTI CLOCKWISE then use a 1/2" ratchet with a 19mm socket to manually
turn your engine clockwise until your crank key is facing 12 o'clock. Youll notice your chain lines will not line up with your crank,cam,fuel pump timing marks. This is ok just as long
as your crank is at 12 Oclock you are now at TDC on No.1 piston. Cam dots should be facing 10oclock and 2oclock.
22) Take a photo of the layout of the chain and tensioners before removing anything. Mark where all dots on your cogs are facing, fuel pump cog mark should be facing around 12 oclockish cams 10 oclock and 2 oclock.
23) Insert your locking pin into fuel pump sprocket i used a screwdriver.
24) Remove vac pump sprocket youll need a 1/2" to 3/8" adapter, remove the nut and the washers do this with the chains still on.
25) Remove tensioners on duplex chain, Hex nuts plus bolts and guides then remove the chain itself.
26) Remove Lower half tensioners, guides, bolts.
27) Remove 4xhex nuts from fuel pump cog with locking pin still in then remove locking pin and remove pump cog along with lower simplex chain reinstall locking pin. Becareful not to lose the shim behind the fuel pump cog.
28) Install new duplex vac cog use your 1/2" to 3/8" adapter chuck it on a rattle gun and tighten it with a drop of locktight, i use the blue stuff but its up to you what you use.
29) Remove locking pin install new fuel pump duplex sprocket install locking pin tighten up hex bolts. Use a straight edge i used a ruler, and check that the fuel pump
sprocket and vac pump sprocket are inline. If there not you may need to order some shims. YD25.com.au stock them. If its allgood and in line tighen hex bolts to 40NM.
30) Remove crank sprocket with hand, put a bit of grease or engine oil on the crank shaft and push your new duplex sprocket on until its just touching the rear crank shaft key. Install
chain and line up the chain coloured links with your sprocket marks. And push the crackshaft cog home. The chain should now be on and installed on the lower part of the engine.
31) Install new tensioners and bolts plus guides, torque tensioner bolts to 10nm, and black hex bolt to 24NM.
32) Remove the tensioner pin for lower chain. lower chain has now been installed and completed.
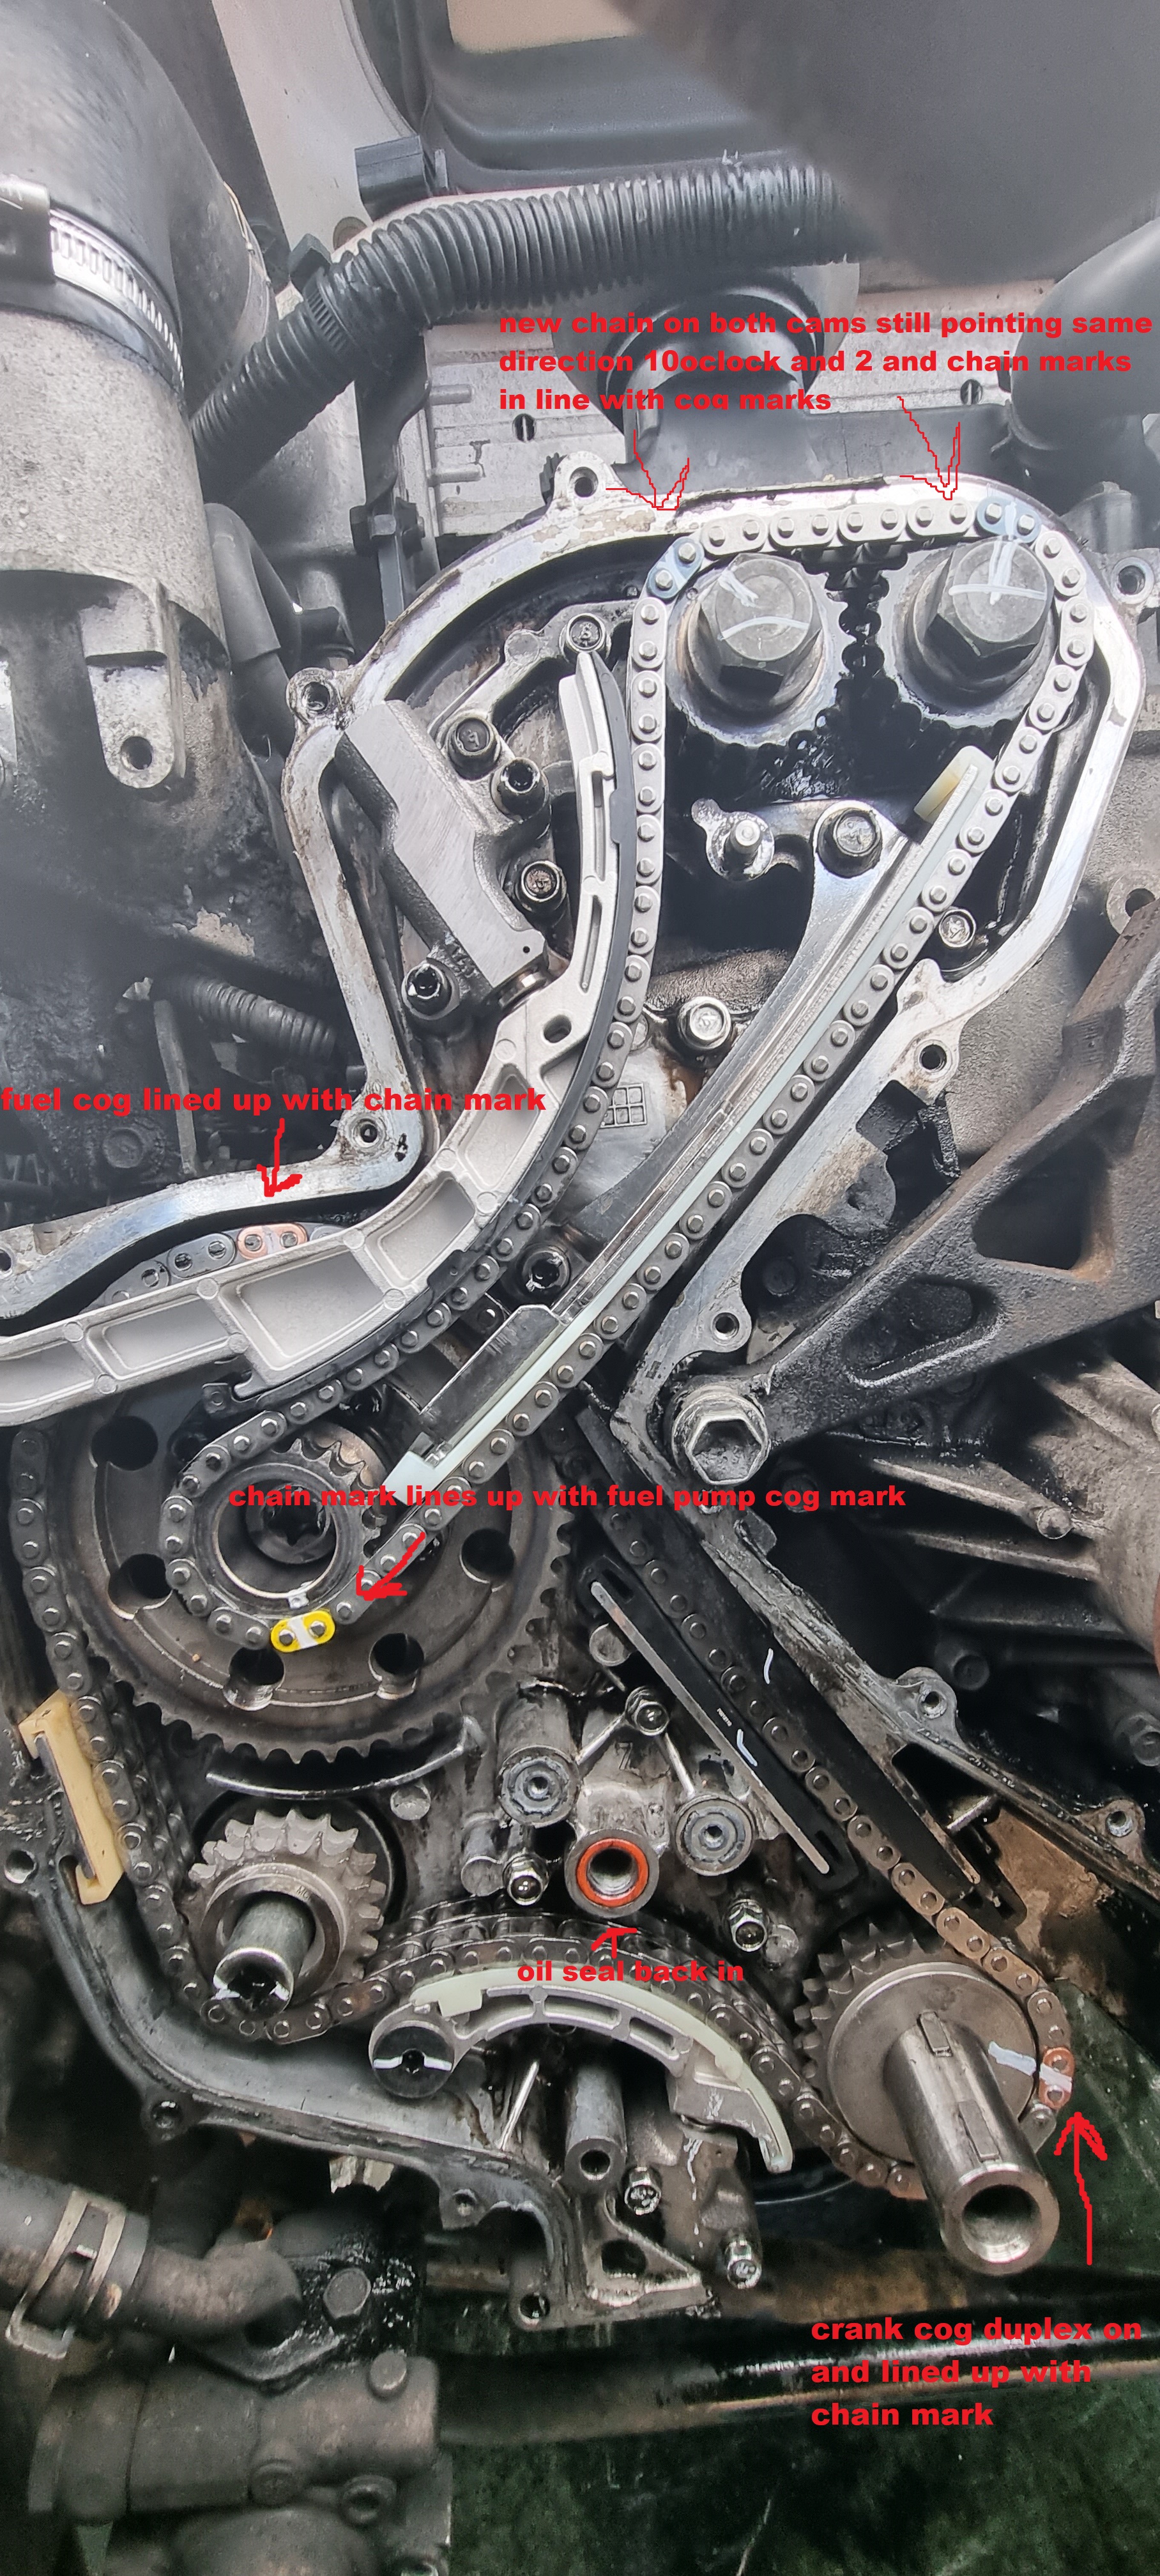
33) Now to do the top chain line up the 2 coloured marks with the cam timing dots and the single coloured mark on chain with the fuel pump cog mark.
34) Install tensioners, guides and bolts and steel backing plate. steel back plate bolts torque to 24NM tensioner bolts 10NM and black hex bolt 24NM.
35) Pull the final tensioner pin the top chain has now been installed. You may or may not need to but i did anyway and that was put a bit of engine oil on the new chains to help lube them
up.
36) Remove fuel pump pin and turn engine over by hand x2 to ensure valves are not hitting piston. Your marks will not line up how you had them before after you turn the engine over a few times.
37) I now took this time to wash all parts in a part washer basically a bucket full of kersone and cleaned off all the old silcone with a drill with wire brush attachment and all the old
gunky oil from the timing chain cover, sump, ally sump i then used a scraper to remove old RTV from engine. I
then replaced to front crank seal with a new one. I used RTV made for engine oil applactions put a little around the orange seal and re applied to timing chain covers installed the lower one first and installed all bolts back, then installed top one. re installed the oil pump with the lower cover.
38) I used rtv on ally sump and a little around the oil pump seal to ensure it stayed there when i installed ally sump re installed all bolts pickup sensor etc.
39) RTV youre black sump and resintall. you may need to use a large flat punch and a hammer to go around and straight your sump back out from bending it when prying off.
40) Reinstall steering idler, AC bracket, power steering bracket,bellhouse, and starter motor and anything else you removed reinstall the harmonic balancer do up to 75NM then undo 360degrees then do back up to 75NM plus 120degrees. DO NOT FORGET TO REINSTALL YOUR 10MM BOLTS INSIDE BELLHOUSE.
ENSURE YOU WAIT 24HOURS BEFORE ADDING OIL TO ENGINE TO MAKE SURE RTV HAS CURED.
41) Reinstall everything else in reverse order.
42) After 24hours fill with engine oil install new coolant into radiator and leave the cap off the raditaor (this will bleed the air from system).
43) Start your engine and let it get warm, check for leaks etc when youre happy turn the engine off top up coolant and install radiator cap.
D22 YD25 2009 NIRVARA 2WD TIMING CHAIN UPGRADE TO DUPLEX.
1) Ensure your car is jacked up and front wheels are off the ground and rear wheels choked
2) Remove batterys
3) Drain engine oil
4) You can drain coolant from bung or do it by removing hoses to raditor top and bottom, over flow hose, remove radiator and brackets, remove fan 4x10mm.
5) Remove all drive belts starting with power steering 12mm pulley tensioner remove bracket completely , losen alternator and slide towards drives side to loosen the tension off belt
remove fan pulley,underneath the engine bay will be another 12mm pulley bolt for AC belt loosen and remove.
6) Remove 2 large coolant hoses from EGR pipe, remove EGR pipe 4x14mm nut, bracket, and 2x12mm inlet pipe.
7) Undo top cover 10mm bolts and pry off top cover ( be careful not the snap or break the cover). there is a dowel pin behind this cover be careful it doesnt fall out and get lost if it falls into the sump its ok as youll need to remove sump later on.
8) Remove power steering brackets and let pump hang out the way
9) Now to remove harmonic balancer bolt to do that put gearbox into 5th gear use a 19mm socket and a breaker bar undo anti clockwise this bolt will be pretty tight you may need a steel tube
to go over your breaker bar for more leverge mine came out pretty easily with a 600mm 1/2" breaker bar.
10) To remove the harmoinic balancer id recommend using this style of puller ToolPRO Bolt Puller Kit 47 Piece youll also need two M6x1.25mmx90mm bolts. on the harmonic balancer inside will be two small threaded holes use the M6x1.25mmx90mm bolts,washer and the tool to remove the balancer. If you use a claw style
puller you may damage the balancer. PUT GEARBOX BACK INTO NETURAL.
11) Remove AC compressor bracket 4x14mm bolts, and underneath will be 2 bolts thatl need to be remove. let compressor hang.
12) Remove all 10mm bolts from lower cover. DO NOT PRY IT YET.
13) REMOVE CRANK ANGLE SENSOR!clean up and put somewhere safe.
14) Remove starter bolts and bellhouse bolts, there are two bolts high up in bellhouse that will be a pain the remove i accessed them by removing the gearstick from inside the cab and running a extension+uni ontop of the bellhouse a mate with a torch will help guide you onto that bolt but i got it off on my own with a bit of perseverance. the top bellhouse bolt closest to the drivers side i got from underneath the bellhouse with 2xUni and a extension. all bellhouse bolts are 14mm. there is one bellhouse bolt above the starter that enters from the opposite side of the bellhouse. i removed the slave cylinder and gearstick but i dont think you have to, i just done it to be safe.
15) Remove cross memeber bolts, i used 2xratchet straps to support the gearbox.
16) Slide the gearbox back enough to get a 1/4" 10mm socket between the bellhouse and engine, there are 2x10mm bolts inside bellhouse thatl need to be removed. BELLHOUSE DOES NOT NEED TO BE REMOVE FULLY JUST ENOUGH TO GET SOCKET IT. GET A TORCH AND LOOK UP YOULL SEE THE 2 BOLTS. REFER TO PHOTO.
17) Remove steering idler bolts 3xbolts going through the chassis on passengers side. you should now be able to move the arm freely so you can push it out the way when you remove the sump. Remove the cross member underneath the sump x4 bolts.
18) Remove dipstick and oil feed hose then black sump bolts all 10mm, and remove. there will be alot of silcone holding it on i used a very very small flat head screw driver and drove it into one side of the sump to break the seal then worked my way around with a blade and removed the sump. Once youve removed this youll see the low oil sensor and pickup with mesh around it , remove the sensor 1x10mm bolt and clean up, remove the pickup 2xbolts and clean up and put somewhere safe with the crank angle sensor.
19) Removal of ally sump 4x12mm bolts in ally sump and 12mm near rear of it. remove all front of sump bolts that sit below the lower chain case i numbered all these holes and numbered the bolts so i wouldnt put the wrong ones in the wrong hole as some are longer than others. Pry off the ally sump and clean up. BEWARE OF THE SEAL THAT SITS ON THE OIL PUMP DO NOT LOSE THIS.
20) Lower cover can now be removed be gentle. once removed inspect your oil pump make sure not much wear is present if it is you can order a upgraded one from yd25 website. remove the oil
pump from crank it should just slide off. put somewhere safe. Check the screws on the housing are tight. BEWARE OF ORANGE OIL SEAL DO NOT LOSE.
21) Ensure your gearbox is in netural and put your 19mm balancer bolt into your crank tighten clockwise DO NOT TURN ANTI CLOCKWISE then use a 1/2" ratchet with a 19mm socket to manually
turn your engine clockwise until your crank key is facing 12 o'clock. Youll notice your chain lines will not line up with your crank,cam,fuel pump timing marks. This is ok just as long
as your crank is at 12 Oclock you are now at TDC on No.1 piston. Cam dots should be facing 10oclock and 2oclock.
22) Take a photo of the layout of the chain and tensioners before removing anything. Mark where all dots on your cogs are facing, fuel pump cog mark should be facing around 12 oclockish cams 10 oclock and 2 oclock.
23) Insert your locking pin into fuel pump sprocket i used a screwdriver.
24) Remove vac pump sprocket youll need a 1/2" to 3/8" adapter, remove the nut and the washers do this with the chains still on.
25) Remove tensioners on duplex chain, Hex nuts plus bolts and guides then remove the chain itself.
26) Remove Lower half tensioners, guides, bolts.
27) Remove 4xhex nuts from fuel pump cog with locking pin still in then remove locking pin and remove pump cog along with lower simplex chain reinstall locking pin. Becareful not to lose the shim behind the fuel pump cog.
28) Install new duplex vac cog use your 1/2" to 3/8" adapter chuck it on a rattle gun and tighten it with a drop of locktight, i use the blue stuff but its up to you what you use.
29) Remove locking pin install new fuel pump duplex sprocket install locking pin tighten up hex bolts. Use a straight edge i used a ruler, and check that the fuel pump
sprocket and vac pump sprocket are inline. If there not you may need to order some shims. YD25.com.au stock them. If its allgood and in line tighen hex bolts to 40NM.
30) Remove crank sprocket with hand, put a bit of grease or engine oil on the crank shaft and push your new duplex sprocket on until its just touching the rear crank shaft key. Install
chain and line up the chain coloured links with your sprocket marks. And push the crackshaft cog home. The chain should now be on and installed on the lower part of the engine.
31) Install new tensioners and bolts plus guides, torque tensioner bolts to 10nm, and black hex bolt to 24NM.
32) Remove the tensioner pin for lower chain. lower chain has now been installed and completed.
33) Now to do the top chain line up the 2 coloured marks with the cam timing dots and the single coloured mark on chain with the fuel pump cog mark.
34) Install tensioners, guides and bolts and steel backing plate. steel back plate bolts torque to 24NM tensioner bolts 10NM and black hex bolt 24NM.
35) Pull the final tensioner pin the top chain has now been installed. You may or may not need to but i did anyway and that was put a bit of engine oil on the new chains to help lube them
up.
36) Remove fuel pump pin and turn engine over by hand x2 to ensure valves are not hitting piston. Your marks will not line up how you had them before after you turn the engine over a few times.
37) I now took this time to wash all parts in a part washer basically a bucket full of kersone and cleaned off all the old silcone with a drill with wire brush attachment and all the old
gunky oil from the timing chain cover, sump, ally sump i then used a scraper to remove old RTV from engine. I
then replaced to front crank seal with a new one. I used RTV made for engine oil applactions put a little around the orange seal and re applied to timing chain covers installed the lower one first and installed all bolts back, then installed top one. re installed the oil pump with the lower cover.
38) I used rtv on ally sump and a little around the oil pump seal to ensure it stayed there when i installed ally sump re installed all bolts pickup sensor etc.
39) RTV youre black sump and resintall. you may need to use a large flat punch and a hammer to go around and straight your sump back out from bending it when prying off.
40) Reinstall steering idler, AC bracket, power steering bracket,bellhouse, and starter motor and anything else you removed reinstall the harmonic balancer do up to 75NM then undo 360degrees then do back up to 75NM plus 120degrees. DO NOT FORGET TO REINSTALL YOUR 10MM BOLTS INSIDE BELLHOUSE.
ENSURE YOU WAIT 24HOURS BEFORE ADDING OIL TO ENGINE TO MAKE SURE RTV HAS CURED.
41) Reinstall everything else in reverse order.
42) After 24hours fill with engine oil install new coolant into radiator and leave the cap off the raditaor (this will bleed the air from system).
43) Start your engine and let it get warm, check for leaks etc when youre happy turn the engine off top up coolant and install radiator cap.
Last edited: